2. From Bootstrap 5 to WordPress Step By Step
Download the sample Bootstrap index.html file below and copy it into index.php remove the Bootstrap card example from last lesson and reload the front page and you should have bootstrap working expect the images, more about this later.
Let’s work from top to bottom index.php
- Add the language attribute function – <html lang=”<?php language_attributes();?>”>
- Replace yout title with <title><?php bloginfo(‘name’) ?></title>
- Body tag <body class=”mt-5″ <?php body_class(); ?>>
Replace Blog name and descriptions with these tags <?php bloginfo(‘name’); ?> and <?php bloginfo(‘description’) ?>
In the search input copy WordPress search functionality
<form role="search" method="get" class="search-form" action="<?php echo esc_url(home_url('/')); ?>">
<label>
<span class="screen-reader-text"><?php echo esc_html__('Search for:', 'textdomain'); ?></span>
<input type="search" class="search-field" placeholder="<?php echo esc_attr_x('Search …', 'placeholder', 'textdomain'); ?>" value="<?php echo get_search_query(); ?>" name="s" />
</label>
<button type="submit" class="search-submit"><?php echo esc_html__('Search', 'textdomain'); ?></button>
</form>Now let’s work on the menu
In the navbar tags let’s delete some <li> tags except one to show the pages on the menu
below code will show the pages you have on the nav bar
                <ul class="navbar-nav ms-auto">
                    <li class="nav-item">
                        <?php
                            $args = array(
                                'theme_location' => 'primary'
                            );
                        ?>
                        <?php wp_nav_menu($args); ?>
                    </li>
                </ul>
Reload the WordPress and you should see the page from WordPress on the menu.
Now lets register the menu for the nav bar and footer in functions.php so we can pick the pages we want to show on the primary menu(nav bar) or footer, copy this code on you functions.php file
//theme support
function adv_theme_support(){
    //nav menus
    register_nav_menus(array(
        "primary" =>  __('Primary'),
        'footer' => __('Footer'),
    ));
}
add_action('after_setup_theme', adv_theme_support());
Reload WordPress and visit the menu on the admin page > appearance, you should see primary and footer, there create a menu and select which pages you want to show on those places.
Displaying Blog Posts
Post Loop and show title, excerpt, date, author name and categories
Delete all the post sample <h2> title and author <h3> and replace it by WordPress post loop functions, for the title, the content, author and the time.
we use in this case <?php the_excerpt(); ? instead of the_content to show only a preview of the post.
<?php if (have_posts()) : ?>
<?php while (have_posts()) : the_post(); ?>
<a href="<?php the_permalink();?>">
<h2 class="post-title"><?php the_title(); ?></h2>
<p><?php the_excerpt(); ?></p>
</a>
<p class="post-meta">Posted by
<a href="#"><?php the_time(get_option('date_format')); ?></a>
by <a href="<?php echo get_author_posts_url(get_the_author_meta('ID')); ?>"><?php the_author(); ?></a>
</p>
<?php endwhile; ?>
<?php else : ?>
<?php echo 'sorry no posts found' ?>
<?php endif; ?>Now lets show the categories for each post
  Posted In
  <?php
   $categories = get_the_category();
  if ( ! empty( $categories ) ) {
    echo '<a href="' . esc_url( get_category_link( $categories[0]->term_id ) ) . '">' . esc_html( $categories[0]->name ) . '</a>';
   }
?>
Change the Excerpt length, default is 55 words lets go to functions.php and change to 30
function set_excerpt_length( $length ) {
    return 30;
}
add_filter( 'excerpt_length', 'set_excerpt_length');
At this point if you click on the post it should show only that post, next we are going to create the post page to show the full length of each post.
Single Post
Enable feature image, in your functions.php inside theme support add these code, then visit any post and the feature image option should be enable upload an image and save it
add_theme_support('post-thumbnails');After you upload images to all the post you can add it to the index.php by using this code. It will show the image thumbnail, if you wish the full image remove ‘thumbnail’ parameter.
 <?php if(has_post_thumbnail()): ?>
    <?php the_post_thumbnail('thumbnail'); ?>
 <?php endif; ?>
Single Post
Now we going to create a file called single.php to show a single post, inside the folder theme after you created the file and click the post you should see a blank page, we need to add the post.html bootstrap template inside this file.
Let’s split index.php – header.php and footer.php
We need to split this some of index.php content file into two files header.php and footer.php, this will allow us to import all the css and js to others files without having to write it multiple times.
Create and header.php and copy the header from index.php here
<!DOCTYPE html>
<html lang="<?php language_attributes(); ?>">

<head>
    <link rel="stylesheet" href="<?php bloginfo('stylesheet_url'); ?>">

    <meta charset="<?php bloginfo('charset') ?>">
    <meta name="viewport" content="width=device-width, initial-scale=1.0, shrink-to-fit=no">
    <title><?php bloginfo('name') ?></title>
    <?php wp_head(); ?>
</head>

<body <?php body_class(); ?>>
    <nav class="navbar navbar-light navbar-expand-lg  my-3 " id="mainNav">
        <div class="container"><a class="navbar-brand" href="index.html">Brand</a><button data-bs-toggle="collapse" data-bs-target="#navbarResponsive" class="navbar-toggler" aria-controls="navbarResponsive" aria-expanded="false" aria-label="Toggle navigation"><i class="fa fa-bars"></i></button>
            <div class="collapse navbar-collapse" id="navbarResponsive">
                <form action="get" action="<?php esc_url('home_url(' / ')'); ?>">
                    <input type="text" name="s" placeholder="Search" style="background: var(--bs-gray-500);border-style: none;color: var(--bs-gray-500);">
                </form>
                <ul class="navbar-nav ms-auto">
                    <li class="nav-item">
                        <?php $args = array('theme_location' => 'primary'); ?>
                        <?php wp_nav_menu($args); ?>
                    </li>
                </ul>
            </div>
        </div>
    </nav>
Create footer.php file and repeat the process
<div class="container">
<div class="row">
<div class="col-md-10 col-lg-8 mx-auto">
<ul class="list-inline text-center">
<li class="list-inline-item"><span class="fa-stack fa-lg"><i class="fa fa-circle fa-stack-2x"></i><i class="fa fa-twitter fa-stack-1x fa-inverse"></i></span></li>
<li class="list-inline-item"><span class="fa-stack fa-lg"><i class="fa fa-circle fa-stack-2x"></i><i class="fa fa-facebook fa-stack-1x fa-inverse"></i></span></li>
<li class="list-inline-item"><span class="fa-stack fa-lg"><i class="fa fa-circle fa-stack-2x"></i><i class="fa fa-github fa-stack-1x fa-inverse"></i></span></li>
</ul>
<p class="text-muted copyright">Copyright © Brand 2023</p>
</div>
</div>
</div>
</footer>
<script src="assets/bootstrap/js/bootstrap.min.js"></script>
<script src="assets/js/clean-blog.js"></script>
</body>
<?php wp_footer(); ?>Inside index.php we need to import these tow files, header at the beginning and footer at the end.
<?php get_header(); ?>


......index.php code


<?php get_footer(); ?>
Reload the page and everything should be the same
Next import the <?php get_header(); ?> and <?php get_footer(); ?> in single.php delete the contact form there since we already have it in index.php
Now all you have to do is replace the title, date, author and content with the php functions used in index.php.
Now test each post and make sure they all work.
The Search Form
You can enable the search feature in WordPress by using the get_search_form function. This function generates the HTML code for the search form and outputs it on your theme’s template files where you want to display the search form.
<form role="search" method="get" class="search-form" action="<?php echo esc_url( home_url( '/' ) ); ?>">
<label>
<span class="screen-reader-text"><?php echo esc_html__( 'Search for:', 'textdomain' ); ?></span>
<input type="search" class="search-field" placeholder="<?php echo esc_attr_x( 'Search …', 'placeholder', 'textdomain' ); ?>" value="<?php echo get_search_query(); ?>" name="s" />
</label>
<button type="submit" class="search-submit"><?php echo esc_html__( 'Search', 'textdomain' ); ?></button>
</form>
The action attribute specifies the URL that the form should submit to. The get_search_query function retrieves the search query entered by the user and displays it in the search field. The esc_url and esc_attr_x functions are used to escape the URL and placeholder text, respectively, to prevent potential security issues.
Let’s clean up index.php with post formats
The index.php file can be cleaner and easier to work on and no repeat the same code. Avoiding code repetition is important because it helps maintain the cleanliness, efficiency, and scalability of the code. Repeated code can make the code harder to read, debug, and update, and also increase the size of the codebase.
Create a file named content.php just for the posts in the theme folder and copy everything inside the while loop in index.php into content.php then we’re going to include this file in index.php by using the code below
<?php get_template_part('content'); ?>Reload the page and everything should be the same.
Add this code in the single.php file as well. Now here we need to show the full post instead of the excerpt
for that we are going to write and if statement in content.php to show the excerpt in index.php but the full article in single.php
            <?php if(is_single()) : ?>
                <p><?php the_content(); ?></p>
            <?php else : ?>
                <p><?php the_excerpt(); ?></p>
            <?php endif; ?>
No reload WordPress and visit a single post, it should have the full content.
Pages
For the pages to show up we need to add another file to the theme folder.
Add page.php then visit any page you’ve added before save it and click any page link and you should see a blank page.
Now copy the content from single.php into page.php to show the full content
Now we need to update the loop inside content.php
            <?php if(is_single()) : ?>
                <p><?php the_content(); ?></p>
            <?php elseif(is_page()) : ?>
                <p><?php the_content(); ?></p>
            <?php else : ?>
                <p><?php the_excerpt(); ?></p>
            <?php endif; ?>
Visit the new page and it should work.
Custom page templates
A WordPress custom template is a PHP file that defines the layout and styling of a specific type of content or page on a WordPress website. By creating a custom template, developers can customize the design and functionality of individual pages or sections of the site, separate from the site's overall theme. Custom templates can be created by adding PHP code to a new file in the theme's directory and then associating it with specific pages or post types through the WordPress admin interface or by using template tags in the content.
Let’s try to customize the about.php page
On the theme folder create page-about.php and visit the about page, this page should be blank, unlike the other pages which should have the template we create before. WordPress is using the slug to generate the unique page. Find the slug on the admin panel on the page section, click quick edit and there should be an option to change it.
Copy the bootstrap template you wish in this page and replace it with WordPress php functions to get the title, content etc… I will no go over this since we already done it a few times, I’ll leave the code I used below.
<?php get_header(); ?>

    <header class="masthead" style="background-image: url('assets/img/post-bg.jpg');">
        <div class="overlay"></div>
        <div class="container">
            <div class="row justify-content-center">
                <div class="col-md-8  col-lg-8  position-relative">
                    <div class="post-heading">
                        <?php if (have_posts()) : ?>
                            <?php while (have_posts()) : the_post(); ?>
                            <?php if (has_post_thumbnail()) : ?>
                                <?php the_post_thumbnail(); ?>
                            <?php endif; ?>
                                <h2><?php the_title(); ?></h2>
                              <?php the_content(); ?>
                            <?php endwhile; ?>
                      </div>
                </div>
                <div class="col-md-4">
                <div class="card" style="width: 18rem;">
                    <div class="card-body">
                        <h5 class="card-title">Card title</h5>
                        <h6 class="card-subtitle mb-2 text-muted">Card subtitle</h6>
                        <p class="card-text">Some quick example text to build on the card title and make up the bulk of the card's content.</p>
                        <a href="#" class="card-link">Card link</a>
                        <a href="#" class="card-link">Another link</a>
                    </div>
                    </div>
                </div>

            <?php else : ?>
                <?php echo 'sorry no posts found' ?>
            <?php endif; ?>
            </div>
        </div>
        </div>
        </div>
    </header>


    <?php get_footer(); ?>
Child Pages
Child pages in WordPress are sub-pages that are nested under a parent page. In the WordPress hierarchy, a parent page can have multiple child pages, each with its own unique content and URL. Child pages are useful for creating hierarchical structures in a website, such as organizing content into sections or categories. For WordPress theme developers, child pages play an important role in creating templates for specific types of content and organizing the site's information architecture. To display child pages, developers can use WordPress functions such aswp_list_pages()orget_pages()to retrieve and display the child pages in a template file.
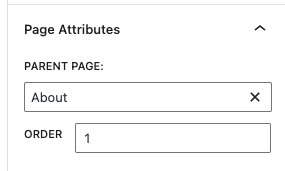
Create another page in the admin panel and assign it as a child page of about this under page atributes
The PHP function in WordPress to display child pages inside a parent page is wp_list_pages(). This function is used to list all the child pages of a given parent page within the WordPress hierarchy. The function can be used in a WordPress theme template file to retrieve and display the child pages in a custom format. The basic syntax for the wp_list_pages() function is:
wp_list_pages(array(
  'title_li' => '',
  'child_of' => $post->ID,
  'sort_column' => 'menu_order',
));
The child_of argument is used to specify the parent page and set it to the current page ID, while the sort_column argument is used to sort the child pages based on their menu order. Additional arguments can be used to further customize the display of child pages. For example, to list child pages in a drop-down menu, you can use the depth argument to limit the number of levels displayed in the menu.
Theme widgets
Theinit_widgetsfunction in WordPress is typically used to initialize and register custom widgets in a WordPress theme or plugin. A widget is a small block of content that can be displayed in a widget-ready area of a theme, such as a sidebar, header, or footer. By using theinit_widgetsfunction, developers can create custom widgets that can be used to display dynamic content or perform specific tasks within the widget-ready areas of a theme.
Let’s create three widgets for the cards on the front page, and one for the page-about.php page.
To enable widgets on the admin panel we need to go to functions.php and write this function, repeat the same for card 2 and 3.
//widgets locations
function init_widgets($id){
    register_sidebar(array(
        'name' => 'Card One',
        'id' => 'card1',
         'before_widget' => '<div class ="side-widget">',
         'after_widget' => '</div>',
         'before_title' => '<h3>',
         'after_title' => '</h3>'
    ));
}
add_action('widgets_init', 'init_widgets');
In this example, the init_widgets function is used to register a new widget area with the ID specified by the $id argument. The register_sidebar function is used to specify the parameters for the widget area, such as the name, before and after widget HTML, and before and after title HTML. With this function in place, custom widgets can be added to the widget area through the WordPress admin interface and displayed in the theme as desired.
Let’ go tot he widget are and fill all the fields and output them on the front page. Add and image a heading and a paragraph then go to index.php and replace the content inside the card one.
<div class="card">
  <?php if(is_active_sidebar('card1')) : ?>
      <?php dynamic_sidebar('card1') ?>
  <?php endif; ?>
</div>
You can adjust the images size on the widget area or use css on style.css file, repeat this process for card 2 and 3.
  .card img{
    height: 250px!important;
  }
Display page/post by their Id’s – Call to action bar
Lets create a page to show on the call to action section by using the page id.
There are several other ways to display a specific page in WordPress:
- Using shortcodes: You can use a shortcode to display a specific page on any post or page. For example, the following shortcode will display the page with ID 123:
[post id="123"] - Using a custom query: You can use a custom query to retrieve the page data and display it on the front end. Here’s an example:
<?php
  $page_id = 123;
  $page = get_post($page_id);
  if ($page) {
    echo '<h2>' . $page->post_title . '</h2>';
    echo apply_filters('the_content', $page->post_content);
  }
?>
Using include: You can include a template file in your theme that displays the specific page. For example, you could create a template file named page-123.php and include it using the get_template_part function:
<?php get_template_part('page', '123'); ?>These are just a few examples of how you can display a specific page in WordPress. I’ve ended up using the first one.
Show the page thumbnail
<?php if (has_post_thumbnail($page_id)) : ?>
    <?php $thumbnail = get_the_post_thumbnail($page_id, 'medium'); ?>
    <?php echo $thumbnail ;?>
<?php endif; ?>
Comments
To show comments template just add this code to post.php to show a simple comment template below the post, we are going to modify later
<?php comments_template(); ?>Let’s customize it, create a new file named comments.php reload the page and the comments section should not be there any more, because now WordPress is reading from comments.php file.
Here is an example where you can customize the comments, also you can use style.css. More at WordPress docs
<?php
$args = array(
	'walker'            => null,
	'max_depth'         => '',
	'style'             => 'ul',
	'callback'          => null,
	'end-callback'      => null,
	'type'              => 'all',
	'page'              => '',
	'per_page'          => '',
	'avatar_size'       => 32,
	'reverse_top_level' => null,
	'reverse_children'  => '',
	'format'            => 'html5', // or 'xhtml' if no 'HTML5' theme support
	'short_ping'        => false,   // @since 3.6
	'echo'              => true     // boolean, default is true
);

?>

<?php wp_list_comments($args, $comments); ?>

<?php
$form_args = array(
    // Change the title of send button
    'label_submit' => __( 'Send', 'textdomain' ),
    // Change the title of the reply section
    'title_reply' => __( 'Write a Reply or Comment', 'textdomain' ),
    // Remove "Text or HTML to be displayed after the set of comment fields".
    'comment_notes_after' => '',
    // Redefine your own textarea (the comment body).
    'comment_field' => '<p class="comment-form-comment"><label for="comment">' . _x( 'Comment', 'noun' ) . '</label><br /><textarea class="col-10" id="comment" name="comment" aria-required="true"></textarea></p>',
);
comment_form( $form_args );
?>
Write some comments and then visit the admin panel comment tab and the comment should be there.
Conclusion
In conclusion, converting a Bootstrap template into a WordPress theme is a great way to create a custom, functional, and dynamic website. By utilizing the power of Bootstrap’s responsive design and WordPress’s robust content management system, you can create a website that not only looks great but is also easy to manage.
In this tutorial, I’ve shown you the steps to take a Bootstrap template and modify it to work as a WordPress theme. From integrating WordPress into the template to setting up the necessary files and functions, you now have the knowledge to create a custom WordPress theme using Bootstrap.
Remember, there is no limit to what you can achieve with WordPress and Bootstrap, and with this tutorial as a foundation, you can now create your own custom WordPress theme with confidence.